Packing Your Kayak for Camping
Do you want to take your paddling to a new level and try your hand at kayak camping? Are you intimidated by all the extra gear and wondering how in the heck you’ll fit it all in your boat? I was too: here are some tips on how to get it done in a quick and efficient manner.
I came to kayaking with a strong background in backpacking so I use my backpacking gear for camping out of my kayak. I do this because my backpacking gear is compact and lightweight and I didn’t have to go out and it saved me from spending more money. Yes, it is true, kayaks can haul more than a backpack but that doesn’t mean we have to or should. . . more on this later. It is my hope that you can take the information here and turn your first kayak camping adventure into a positive experience.
Camping Gear
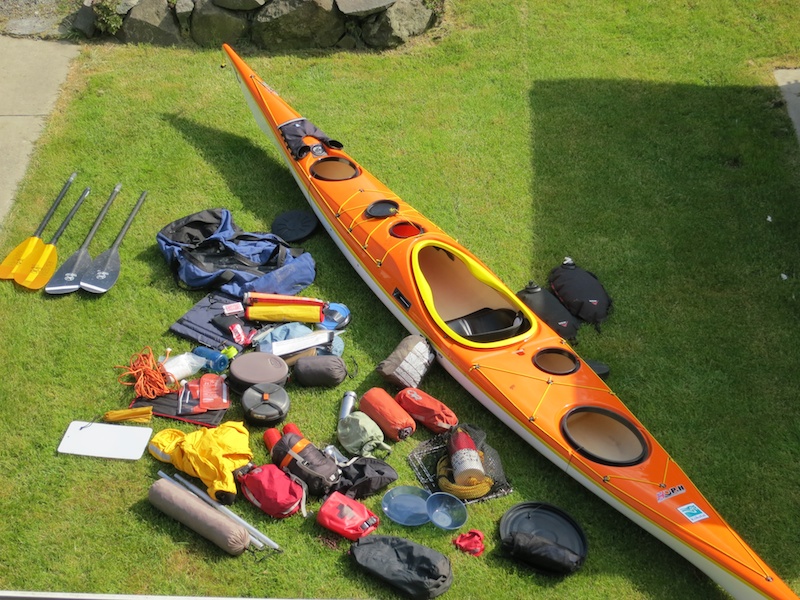
First things first, the camping gear. The nice thing about camping is that you basically take the same stuff with you each time. I have come up with an inclusive list of ALL my kayak camping gear. I use this list as a guide when packing for an overnight trip whether it be for one night or several weeks. This doesn't mean I take everything on the list every time.
For shorter trips you can bring along a few luxury items such as a dutch oven. Longer trips require more food and/or water, of course, and more exposed or isolated trips require you to pack additional repair and survival gear, but the basics remain the same: Emergency Kit, Food, Water and Shelter.
My list works for me and I would encourage you to come up with your own list that works for you. My list is broken down in sections according to use and color coded dry sacks. Here is a copy of my ![]() Extended Kayak Gear List47.81 KB and an explanation of how I have it broken down:
Extended Kayak Gear List47.81 KB and an explanation of how I have it broken down:
The “Paddling Essentials” section is everything I wear or have within reach while paddling. The “Hypothermia Kit” is always in a dark blue, 15L dry sack. The Emergency Shelter is only carried when I am leading a group and is in its own bag. My “Emergency/Repair Kit” is always stored in an orange, 5L dry sack. My “First Aid Kit” is always stowed in a red 5L dry sack and is labeled and marked with large black crosses. My “Clothing” is stored is a grey, 13L dry sack. My “Personal Care” section is always stowed in a green, 10L dry sack with my deodorant, toothbrush & paste, & Q-tips stored in a small ditty bag inside the green bag. I also include my headlamp and lantern in this bag as I always bring this bag to the campsite with me. The “Outerwear” section is stored in an orange, 15L dry sack. My “Kitchen” supplies are stowed in a non waterproof stuff sack and the stove and fuel are not in a bag. My “Food” items are there just to remind me to pack them. These items are generally in various bags or are rat holed (a highly technical term: meaning storing it wherever you find space) in various spaces depending on packaging. My “Camping Gear” is also in various non waterproof bags except for the sleeping bag and it is in dry compression sack. The items listed under “Miscellaneous” are generally items not kept in specific bags and may or may not be taken depending on the trip.
The important point I am trying to make here is to explain how I have chosen to divide and store my gear. This is a system that works for me and that I have developed while kayak camping from the Puget Sound to the Washington and Vancouver BC Coastlines.
Dry Sacks
Most modern Sea Kayaks have “watertight” hatches and bulkheads, I use the term “watertight” here loosely. Water inevitably will get in and get your gear wet. Which is where dry sacks come in handy. They also serve a safety function, by essentially creating several small float bags that will help keep your kayak afloat if you happen put a hole in the hull.
When it comes to dry sacks, size matters and bigger is not better. Choose smaller bags because they are easier to fit through your hatches and pack into your boat.
Dry sacks are sized by volume and measured in liters. I use dry sacks that are 15L or smaller. Dry sacks are made of many different materials explore the tabs below for a comparison of each type.
-
-
Harstine Island is the largest island in the south sound and one that can be easily paddled around in 2 days by taking advantage of the WWTA campsites nearby. For those looking for a challenge you can do this 22nm paddle in a single day by harnessing the spring tides.
There is lot to see along the way such as Hope Island, a reef extending off the southern end of Squaxin Island, and miles upon miles of beautiful shoreline.
You have several different launch points to choose from depending on where you are coming from and what the currents are doing.
-
Pickering passage is a narrow constricted passage with current flows up to 2 kts. Wind against this current will mean rougher waters.
-
Distance: - 22 NM
Charts: Launch: Radio Channels: - VHF 16
Weather: Tidal Stations: - Pickering Passage North (Currents)
- Graham Point (Currents)
- Pickering PAssage South (Currents)
- Peale Passage North (Currents)
- Squaxin Passage (Currents)
- Dana Passage (Currents)
- Walkers Landing (Tides)
- Arcadia (Tides)
- McMicken (Tides)
-

Outdoor Research and Sea to Summit make great dry bags. I have Outdoor Research’s Durable Dry Sacks, Ultralight Dry Sacks and Airpurge Dry Compression Sacks. I also use the Sea to Summit’s Ultra-Sil® Dry Sack and the eVAC™ Dry Sack.
Trimming The Boat
After looking at my list, you might be thinking, Ooh my god, how will this all fit in my boat? Going back to my backpacking roots, I was able to pack everything I needed into a backpack for an 8 day camping in the wilderness, so surely you can get the same into a kayak and more. In fact the average sea kayak holds twice as much gear as a backpack.
Keep in mind, kayaks do have weight limitations set by the manufacturers and going beyond these limitations can adversely effect boat performance, stability and maneuverability. The trick is to make sure the weight of your gear and you does not exceed the maximum weight range set by the manufacturer and is distributed correctly in the boat. Being over the weight limit is not necessarily a show stopper, but you must understand that the boat may not perform as you are used to.
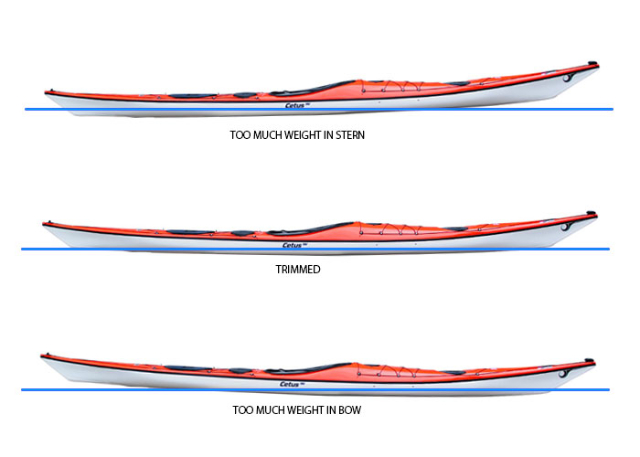 The goal when placing gear in your boat is to have the weight distributed equally fore and aft (front and back) and side to side, this is called trimming your boat. A neutral trim would mean an equal distribution of weight along the length of the kayak so the bow and stern were equally weighted. Boat speed will be best if you have the trim adjusted correctly.
When loaded, if the bow is higher than the stern, (tail heavy) the boat speed is usually reduced as the kayak tries to “climb over its wake” and this allows the bow to be more easily pushed by the wind.
If the bow is excessively lower than the stern, (nose heavy), the water line length of the kayak is not efficient, and excessive bow wave making slows the boat. This also makes steering difficult as the bow acts like a knife edge carving the water throwing the bow off course and the stern is more easily pushed around by any wind or waves.
If you have one side loaded with more weight than the other, this causes you to be constantly on an edge, making controlling your boat more difficult as it will always want to turn in one direction.
Packing Your Boat
Once you ave have amassed all your gear it is time to do a dry run and truly see if everything fits. Take your boat down and place it on the ground in a place where you will have plenty of room. Place all of your gear in a large pile away from the boat. Now start by placing items on the ground next to the boat where they will be stored.
 Here are some simple guidelines to help you when deciding where to place items:
1. Heavy items should be placed low in the boat and near your butt. Water, if you have to carry it, will probably be your heaviest item and should be placed behind your seat, if you have room, or in your day hatch. This keeps the center of gravity low and near you which means better stability.
2. Smaller and lighter items can be placed farther out from the cockpit. The smallest and lightest should be shoved up in the ends of your boat. Tent poles, flat items, etc. do well along the hull of the boat.
Safety Considerations
Now, lets talk about storing items on the deck of your boat. Whenever you place items on the deck of your boat, you are effectively raising the center of gravity of your boat and making it less stable. You also make rescues more difficult if you have large items strapped to your back deck because you’ll have to climb up and over this stuff to get back into your boat. I personally try to get everything inside my hatches as I like a clean top deck and cockpit.
Here is an excellent to link about kayak stability and center of gravity by Guillemot Kayaks
You should avoid putting anything in your cockpit that could stop you from wet exiting from your boat. Don’t place ANYTHING between your legs. If an item is stored between your legs it inhibits your ability to bring your legs out of your cockpit thus trapping you in your boat when upside down.
You can safely store an item in front of your foot pegs or behind your seat so long as it is secured in place with no chance of coming free and sliding between your legs.
I hope this has helped a bit.
Have Fun and Be Safe